What to Consider Before Installing Grab Bars in the Bathroom

North Georgia Mobility
Bathroom with different styles of grab bars installed.

Thinking about making your bathroom safer? Installing grab bars might just be the way to go, especially if you have older folks at home. These bars can stop accidents before they happen and give everyone a bit more confidence when moving around. But before you jump in, there are a few things you should know. From picking the right type to figuring out the best spot to install them, there’s more to it than just grabbing a drill. Let’s break down what you need to consider.

Key Takeaways

  • Understand the different types of grab bars available and their specific benefits.
  • Choose materials that offer both durability and safety for long-term use.
  • Think about the best spots in your bathroom for installing grab bars for optimal support.
  • Prepare your bathroom walls properly to ensure the grab bars are securely installed.
  • Regularly check and maintain your grab bars to keep them in top condition.


Understanding the Importance of Grab Bars for Bathroom Safety

Why Grab Bars Are Essential for Elderly Home Care

As we age, our bodies naturally become less steady, and the bathroom can quickly turn into a danger zone. Grab bars are a vital tool for elderly home care because they offer that extra bit of support when it's needed the most. Imagine trying to get out of a slippery tub or standing up from a low toilet seat without anything to hold onto – it's a recipe for disaster. Grab bars provide the stability needed to navigate these tricky spots safely. They help maintain balance, reduce the risk of falls, and give seniors the confidence to move around independently.

The Role of Grab Bars in Preventing Bathroom Accidents

Bathrooms are infamous for being slippery, with wet floors and smooth surfaces everywhere. It's no surprise that many household accidents happen here. Grab bars act as a safety net, offering a secure place to hold onto when things get slick. They are strategically placed, often near the shower, tub, or toilet, to help prevent slips and falls. This simple addition can make a huge difference in reducing accidents, especially for those who might struggle with mobility issues.

How Grab Bars Enhance Independence and Confidence

For many, maintaining independence is key to a happy life. Grab bars play a crucial role in this by providing the support people need to manage daily routines without assistance. When you know there's something sturdy to grab onto, it boosts your confidence. You’re not just relying on your balance; you have a backup. This sense of security is invaluable, particularly for those who want to stay in their own homes as they age. Grab bars empower individuals to perform tasks like bathing and using the toilet with minimal help, preserving their dignity and independence.


Installing grab bars isn't just about adding a safety feature; it's about creating a space where people feel secure and self-reliant. It’s a small change that can lead to a big improvement in quality of life.

Choosing the Right Grab Bars for Your Bathroom

Types of Grab Bars and Their Benefits

When it comes to grab bars, there's a variety to choose from, each with its own perks. Straight grab bars are the most common and versatile, fitting well in almost any bathroom setup. Then there are the L-shaped ones, which are perfect for corners or areas where you need a bit more support. If space is an issue, consider foldable grab bars that tuck away when not in use. Each type serves a specific need, so think about what works best for your space and who will be using it.

Material Considerations for Durability and Safety

The material you pick for your grab bars can make a huge difference in both durability and safety. Stainless steel is a popular choice because it's strong, rust-resistant, and easy to clean. If you're looking for something that blends with your bathroom decor, consider bars made of brass or even plastic. Just make sure whatever you choose can handle the weight and won't corrode over time. It's important to think about who will be using the bars and ensure the material suits their needs.

Selecting the Appropriate Size and Style

Size and style matter more than you might think. Grab bars come in different lengths—typically ranging from 12 to 48 inches. The right size depends on where you're installing them and how they'll be used. Style is another aspect to consider, especially if you're aiming for a cohesive look in your bathroom. You can find grab bars in various finishes, from shiny chrome to matte black, so there's something for every taste. Remember, the goal is to combine functionality with aesthetics, ensuring the bars are both useful and pleasing to the eye.


Optimal Placement of Grab Bars for Maximum Safety

Key Locations for Installing Grab Bars

When it comes to bathroom safety, knowing where to install grab bars can make all the difference. Strategically placing grab bars in your bathroom is key to preventing slips and falls. Here are some prime locations:

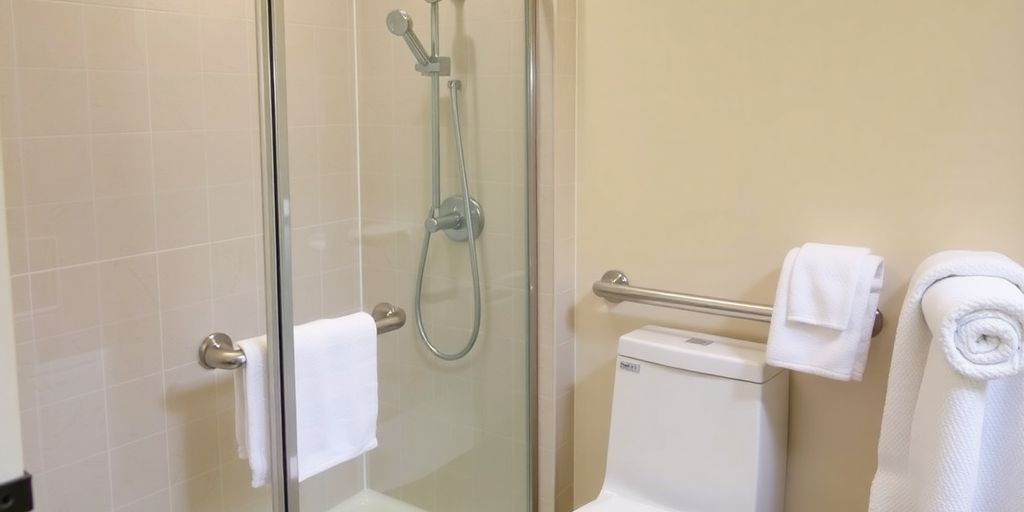
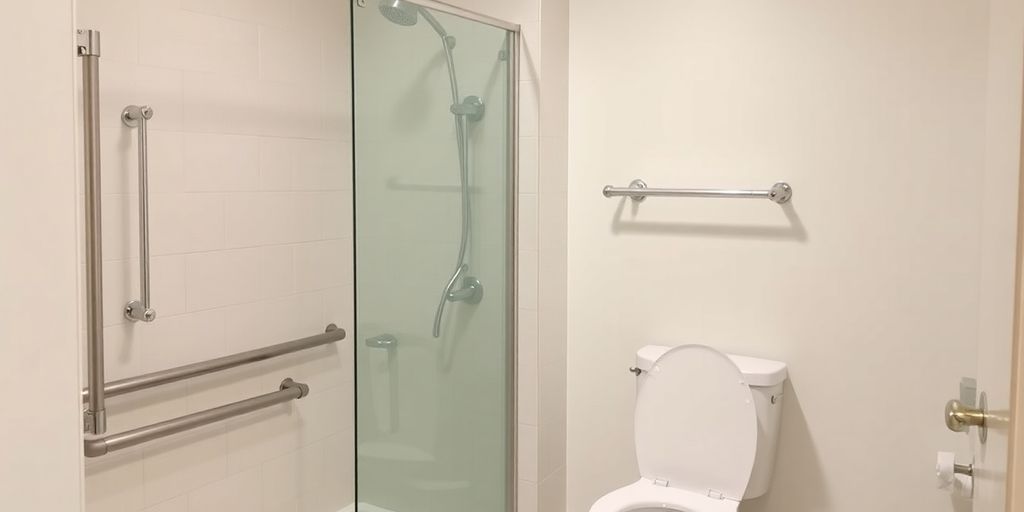
  • Near the Shower or Tub: Install a vertical grab bar at the entrance to help with stability while stepping in or out. A horizontal or diagonal bar inside can provide support while showering.
  • Beside the Toilet: A grab bar on the wall next to the toilet offers assistance when sitting down or standing up. Consider an L-shaped bar for added support.
  • Alongside the Bathroom Walls: Placing grab bars along the walls can help with balance and provide a steady handhold when moving around.

Height and Orientation Guidelines

Getting the height and angle right is crucial for the effectiveness of grab bars. Typically, they should be mounted:

  1. 34-36 inches above the floor for horizontal bars, which is a comfortable height for most people.
  2. Vertically at the entrance of showers or tubs to aid in stepping in or out safely.
  3. Diagonally inside the shower to provide a natural grip and support.

Customizing Placement for Individual Needs

Every individual's needs are different, and so should be the placement of grab bars. Here are some tips to tailor them to specific requirements:

  • Consult with an Occupational Therapist: They can provide insights on the best placement according to personal mobility needs.
  • Consider the User's Height and Reach: Adjust the height and position of grab bars to fit the user's stature and arm length.
  • Adapt for Assistive Devices: If wheelchairs or walkers are used, ensure grab bars are accessible and do not obstruct the path.
Remember, the goal of installing grab bars is not just about meeting safety standards but ensuring they are practical and user-friendly for everyone in the household.

Preparing Your Bathroom for Grab Bar Installation

Assessing Wall Structures and Support

Before diving into the installation, it's super important to know what you're dealing with behind those bathroom walls. Understanding your wall structure can make or break the installation process. Here are a few things to consider:

  • Wall Material: Is your wall made of drywall, tile, or something else? This will determine the type of anchors you'll need.
  • Stud Location: Use a stud finder to locate studs, as these are the best spots to secure grab bars for maximum support.
  • Wall Condition: Check for any signs of damage or weakness that might need fixing before installation.
Knowing your wall's structure ensures that your grab bars will be both safe and durable.

Gathering Necessary Tools and Materials

Once you’ve got a handle on your wall situation, it’s time to gather your tools and materials. Having everything ready before you start can save a lot of headaches. Here’s a basic list:

  1. Grab Bars: Choose ones that fit your style and needs.
  2. Drill and Drill Bits: Essential for making holes in the wall.
  3. Wall Anchors: Especially if you can’t mount directly into a stud.
  4. Screwdriver: For securing the grab bars in place.
  5. Level: To ensure everything is straight.

Having the right tools on hand is half the battle won.

Ensuring Compliance with Safety Standards

Safety first, right? You want to make sure your grab bars aren’t just handy but also meet the necessary safety standards. This is crucial for peace of mind and ensuring they do their job effectively.

  • ADA Compliance: Check if your grab bars meet the standards set by the Americans with Disabilities Act.
  • Weight Capacity: Ensure they can support at least 250 pounds, though many are rated for more.
  • Proper Installation: Follow the manufacturer's instructions carefully to maintain safety ratings.
Ensuring compliance with safety standards not only protects you but also prolongs the life of your grab bars.

The Installation Process: Step-by-Step Guide

Tools and Materials Needed for Installation

Before diving into the installation, gather all the necessary tools and materials. Having everything ready will make the process smoother and less stressful. Here's what you'll need:

  • Drill and Bits: Essential for creating holes in walls.
  • Stud Finder: To locate the studs in your walls for secure mounting.
  • Tape Measure: For precise measurements.
  • Eye Protection: Safety first!
  • Grab Bars: Make sure they're the right type and size for your needs.
  • Wall Anchors: If you're not mounting directly into studs.
  • Painter’s Tape: Useful for marking drill spots without damaging walls.

Step-by-Step Instructions for Secure Installation

Installing grab bars is straightforward if you follow these steps:

  1. Choose the Location: Decide where the grab bars will be most useful, typically near toilets and in showers.
  2. Mark the Drill Spots: Use the painter’s tape to mark where you'll drill. This helps prevent the drill bit from slipping.
  3. Locate the Studs: Use the stud finder to ensure you're drilling into a stud for maximum support.
  4. Drill Pilot Holes: Use a drill bit slightly smaller than your screws to make pilot holes.
  5. Mount the Grab Bars: Attach the grab bars using the screws provided. Make sure they're secure by giving them a good tug.

Common Challenges and How to Overcome Them

While the process is generally simple, you might encounter some hiccups:

  • Finding Wall Studs: If you're having trouble, double-check with the stud finder or consult a professional.
  • Dealing with Tile Walls: Use a masonry bit to avoid cracking tiles when drilling.
  • Ensuring Weight Capacity: Make sure the grab bars are rated for the weight they need to support.
Installing grab bars can significantly enhance bathroom safety. Regular checks and maintenance ensure they remain effective and secure.

Maintaining and Inspecting Your Grab Bars

Regular Maintenance Tips for Longevity

Keeping your grab bars in tip-top shape isn't just about looks—it's about safety too. Here are some easy tips to keep them in working order:

  • Check for loose screws or bolts regularly. A wobbly grab bar is a no-go.
  • Wipe them down with mild soap and water to keep grime at bay. This keeps them looking nice and prevents build-up.
  • Keep an eye out for rust, especially in damp spots like the shower. Rust can weaken the bar and make it unsafe.
A little upkeep goes a long way in ensuring your grab bars remain a reliable support.

Signs That Your Grab Bars Need Replacement

Knowing when to swap out your grab bars is crucial. Here’s what to watch for:

  1. Rust or corrosion that's more than just surface deep.
  2. Cracks or any kind of breakage in the bar itself.
  3. If it feels loose or wobbly when you grab it, it's time for a change.

Professional Inspection Services for Safety Assurance

Sometimes, a professional's eye is what you need to make sure everything's up to snuff. Here's why you might want to consider it:

  • They can check the quality of the installation to ensure it's up to standard.
  • Professionals can recommend replacements or adjustments if needed.
  • They ensure that your grab bars are compliant with safety standards.
Bringing in a pro can give you peace of mind that your home is as safe as it can be.

Cost and Funding Options for Grab Bar Installation

Understanding the Costs Involved

Installing grab bars isn't just about buying the bar itself. There's more to it, like the labor and any extra work needed to make sure they're secure. Typically, you might spend anywhere from $100 to $300 per grab bar. Here's why:

  • Type of Grab Bar: If you're going for something fancy or extra sturdy, that can bump up the cost.
  • Installation Fees: Hiring someone to do it right? Expect to pay between $50 to $150 per hour.
  • Wall Reinforcements: Sometimes, your bathroom walls might need a bit of beefing up to safely hold the bars.


Exploring Insurance and Funding Options

Not everyone knows this, but there might be funding out there to help with grab bar costs. Here are a few avenues to explore:

  1. Government Grants: Some local and federal programs offer support for home safety upgrades.
  2. Insurance Coverage: It's worth checking if your policy covers home modifications.
  3. Non-Profit Assistance: Groups like Rebuilding Together often help out low-income families.
It's smart to dig into all the available options to make sure you can afford these important safety features.

Getting a Free Quote from Local Installers

Before you settle on anything, it's a good idea to get a few quotes. This way, you can compare prices and services. Here's how to go about it:

  • Research Local Installers: See what others are saying about them.
  • Request Quotes: Reach out to at least three installers to get a sense of the costs.
  • Ask About Discounts: Some places might offer deals for seniors or veterans.

For those considering broader bathroom modifications, keep in mind that basic handicap shower installation costs can range from $2,000 to $5,000, which often includes essentials like non-slip flooring and grab bars.

If you're considering installing grab bars, understanding the costs and funding options is essential. We can help you navigate through this process. Visit our website to get a free quote and learn more about how we can assist you with your mobility needs!


Conclusion

So, there you have it. Installing grab bars in your bathroom isn't just a good idea—it's a smart move for safety and peace of mind. Whether you're doing it for yourself or a loved one, these bars can make a world of difference. They help prevent slips and falls, which is a big deal, especially in a place as slippery as a bathroom. Remember, it's not just about picking any grab bar; it's about choosing the right one and putting it in the right spot. And while you might be tempted to DIY, sometimes calling in a pro is the best way to go. They know the ins and outs and can make sure everything's secure. So, take a look around your bathroom, think about where you need that extra support, and get started. It's a small change that can make a big impact.


Frequently Asked Questions

What exactly are grab bars, and why are they needed?

Grab bars are sturdy bars that help people keep their balance and avoid falls, especially in wet places like bathrooms. They are vital for safety as they offer support when moving around.

Where should grab bars be installed in a home?

Grab bars should be placed in areas where extra support is needed, like near toilets, in showers, or by steps. It's best to put them where they can provide the most help.

Is it possible to install grab bars on my own, or should I hire someone?

While some people can install grab bars themselves, it's often safer to hire a professional. They can ensure the bars are properly and securely installed.

How much does it typically cost to have grab bars installed?

The cost of installing grab bars can vary. It usually depends on the type of bar and the complexity of installation, ranging from $100 to $300 per bar.

What types of grab bars are available for bathrooms?

There are several types of grab bars, including straight bars, L-shaped bars, and foldable ones. The choice depends on the specific needs and space available.

How do I choose the right grab bars for my bathroom?

When choosing grab bars, consider the material, length, and weight capacity. Stainless steel is durable, and the bar should be long enough to provide adequate support.

home accessibility GA
By Rise Design February 28, 2026
Spring cleaning tips for home accessibility in GA. Make your home safer & more accessible with mobility solutions.
spring mobility safety
By Rise Design February 28, 2026
Spring mobility safety tips for seniors in Ringgold & Chattanooga. Enhance safe travel & home accessibility.
mobility scooters GA
By Rise Design February 28, 2026
Explore North Georgia's spring beauty with mobility scooters GA. Find the perfect scooter for outdoor adventures & local resources.
adaptive driving aids
By Rise Design February 28, 2026
Explore adaptive driving aids to regain independence this spring. Learn about options, installation, and maintenance.
post-winter mobility
By Rise Design February 28, 2026
Overcome post-winter mobility challenges with tips on stiffness, balance, strength, home mods, vehicle access & professional help.
stair lift installation GA
By Rise Design February 28, 2026
Spring is the perfect time for stair lift installation in GA. Enhance home accessibility & mobility. Get expert service!
mobility equipment maintenance
By Rise Design February 28, 2026
Ensure your mobility equipment is spring-ready with our maintenance checklist. Essential checks for scooters, wheelchairs, lifts & more.
mobility solutions GA
By Rise Design February 28, 2026
Discover local mobility solutions GA for independence. Vehicle & home modifications. Serving Northwest Georgia for 30 years.
mobility scooter maintenance
By Rise Design January 31, 2026
Winter can be a tough time for everyone, and sometimes that includes our trusty mobility scooters. Cold weather and damp conditions can take a toll on these devices, making them less reliable. But don't let that get you down! With a little bit of attention and some smart mobility scooter maintenance, you can keep yours running smoothly through the chilly months here in Dalton, Ringgold, and LaFayette. It's not complicated, just a few things to keep an eye on. Key Takeaways Regularly check your scooter's battery, especially in colder weather, to make sure it holds a charge and gives you the range you need. Keep an eye on your tires – make sure they have enough air and the tread isn't worn down. This helps with grip and a smoother ride. Test your brakes often to confirm they're working right. Safety first, always. Cleaning your scooter regularly and protecting it from rain and moisture will help prevent rust and keep parts working well. Know when to call a professional. If you hear strange noises, your scooter slows down a lot, or you have trouble steering, it might be time for expert help. Essential Mobility Scooter Maintenance Checks Keeping your mobility scooter in good shape means you can rely on it day in and day out. A little regular attention goes a long way, especially when the weather turns cold here in North Georgia. Let's look at some key things to check. Battery Care for Extended Range The battery is the heart of your scooter, so taking care of it is super important. Proper battery maintenance can significantly extend its lifespan and ensure you get the most range out of each charge. Charge Regularly: Don't wait until the battery is completely dead. It's best to charge it after each use, or at least every night. This keeps the battery cells healthy. Use the Right Charger: Always use the charger that came with your scooter or a manufacturer-approved replacement. Using the wrong charger can damage the battery. Avoid Extreme Temperatures: Batteries don't like being too hot or too cold. If you store your scooter outside, try to bring it inside during very cold weather. Check Connections: Make sure the battery terminals are clean and the connections are tight. Loose or corroded connections can cause charging problems and reduce power. Keeping your battery charged properly is probably the single most effective thing you can do to keep your scooter running well for a long time. It's not complicated, but it does require a bit of routine. Tire Pressure and Tread Inspection Your tires are what keep you moving smoothly and safely. Checking them regularly is a simple but vital step. Check Tire Pressure: Most scooter tires are pneumatic (filled with air). Look for the recommended PSI (pounds per square inch) on the tire sidewall. Over or under-inflated tires can affect handling and wear out faster. Inspect for Wear: Look closely at the tire tread. If it looks worn down, smooth, or has any cracks, it's time to think about replacing them. Good tread helps with grip, especially on damp surfaces. Look for Damage: Keep an eye out for any cuts, bulges, or embedded objects in the tires. Small things can become big problems if left unchecked. Brake System Functionality Your brakes are your primary safety feature. You need to know they'll work when you need them. Test Them Regularly: Before you set off on a longer trip, give your brakes a quick test. Gently apply them to feel how responsive they are. Listen for Sounds: Unusual grinding or squealing noises could mean your brake pads are worn or something is out of adjustment. Check for Smoothness: The brakes should engage smoothly without feeling jerky or sticking. If they feel weak or grabby, it's time for a closer look. Don't put off checking your brakes. They are a critical safety component, and a small issue now can become a serious hazard later. If you're unsure about how they feel, it's always better to get them checked out. Keeping Your Mobility Scooter Clean and Protected Taking care of your mobility scooter means more than just checking the battery and tires. Keeping it clean and protected, especially during the colder months, really helps it run better and last longer. It’s not a huge chore, but a little effort goes a long way. Regular Cleaning for Optimal Performance Dirt and grime can build up surprisingly fast, and this stuff can actually get into moving parts and cause problems. Think of it like not changing the oil in your car – eventually, things start to wear out faster. A good wipe-down after you use it, especially if you’ve been out on a damp day, is a good habit to get into. You don't need fancy cleaners, just a damp cloth usually does the trick for most of the scooter. For tougher spots, a mild soap and water solution works well. Just make sure to dry it off afterward so you don't get water spots or rust. Wipe down the frame and body with a damp cloth. Clean the control panel and joystick gently. Don't forget to clean the seat and armrests. Protecting Against Winter Elements Winter weather here in North Georgia can be tough on equipment. Rain, maybe some sleet, and even just damp air can lead to rust and corrosion if you’re not careful. When using a mobility scooter in winter, prioritize safety by avoiding ice, increasing your visibility, and keeping the scooter clean. It’s a good idea to cover your scooter when it’s parked outside, even if it’s just for a little while. A simple tarp or a fitted scooter cover can make a big difference in keeping the moisture out. If you do get caught in the rain or snow, try to dry your scooter off as soon as you can. This is especially important for the electrical components and the battery terminals. You can find good covers at places that sell mobility equipment, or even just use a sturdy tarp. Keeping it out of the worst of the weather helps a lot. Taking a few minutes to protect your scooter from the elements can prevent bigger headaches down the road. Think about where you park it too – a garage or covered porch is always better than out in the open. Seat and Upholstery Care Your seat is where you spend most of your time, so keeping it clean and in good shape is important for comfort. Spills can happen, and winter means bringing in more dampness from your clothes. Check the upholstery regularly for any tears or worn spots. If you have fabric seats, a gentle fabric cleaner can help with stains. For vinyl or leatherette, a damp cloth is usually enough. Make sure to let the seat air dry completely before your next ride. A clean seat just makes the whole experience more pleasant, and it helps the scooter look better too. If you notice any small rips, it might be worth looking into getting them repaired before they get bigger. You can often find replacement parts or covers for your specific model if needed. Addressing Common Mobility Scooter Issues Even with regular upkeep, your mobility scooter might throw a curveball now and then. Don't let a little hiccup stop you from getting around. Most common problems are pretty straightforward to figure out and often fixable without a trip to the shop. Troubleshooting Unusual Noises Sometimes, your scooter might start making noises it never did before. It can be a bit unsettling, but usually, it's just a sign that something needs a little attention. Listen closely to where the sound is coming from and when it happens. Squeaking or Grinding: This often points to issues with the wheels, bearings, or brakes. Check if anything is rubbing or if the wheel bearings feel loose. Sometimes, a bit of lubrication in the right spot can do wonders. Clicking Sounds: A clicking noise, especially when turning, might mean something is loose in the steering column or a component in the drivetrain needs tightening. Whirring or Humming: This could be related to the motor or gearbox. If it's louder than usual, it might be time to check the motor brushes or the gearbox oil level. When you hear a new sound, try to pinpoint its origin. Is it constant or only when you move? Does it happen when you turn, brake, or go over bumps? This information is super helpful if you end up needing to talk to a repair person. What to Do About Slower Speeds If your scooter isn't zipping along like it used to, there are a few common culprits. Don't assume it's a major breakdown right away. Battery Check: This is the most frequent reason for reduced speed. Batteries lose their charge capacity over time. If they're old or not holding a charge well, your scooter will feel sluggish. Make sure they're fully charged and consider their age. Tire Issues: Underinflated tires create more drag, making the motor work harder and slowing you down. Also, check for any debris stuck in the tires or wheels that might be causing resistance. Weight Load: Are you carrying more than usual? Exceeding the scooter's weight limit will naturally reduce its performance. Motor or Controller Problems: Less commonly, the motor itself or the electronic controller might be having issues, leading to a loss of power. Steering and Control Adjustments Feeling like your scooter isn't steering quite right? Maybe it pulls to one side, or the steering feels loose. These issues can affect your confidence and safety. Alignment: If the scooter consistently pulls to one side, it might need a steering alignment. This is often something a service center can adjust. Loose Components: Check the tiller (the steering column) and the connections to the front wheel. Sometimes, bolts can loosen over time, causing play in the steering. Tire Wear: Uneven tire wear can also contribute to steering problems. Make sure your tires are wearing evenly and are properly inflated. If you're uncomfortable making any adjustments or if the problem persists after basic checks, it's always best to get it looked at by a professional. They have the tools and knowledge to diagnose and fix these issues properly. Seasonal Mobility Scooter Maintenance Schedule Keeping your mobility scooter in good shape isn't just a year-round job; it's about adapting to the seasons. What works in the summer might not be enough when the cold and damp set in, and you'll want to get it ready for warmer weather too. Think of it like getting your car ready for winter – a little attention now saves a lot of headaches later. Pre-Winter Storage Preparations Before you tuck your scooter away for the colder months, there are a few things you should do. Proper storage can prevent damage and make sure it's ready to go when spring rolls around. Charge the Battery Fully: Make sure the battery is at 100% before storing. If you're storing it for a long time, you might need to top it up every month or so. Check your scooter's manual for specific recommendations. Clean It Up: Give your scooter a good wash and dry. Get rid of any dirt, mud, or salt that could cause corrosion. Protect Moving Parts: A light coat of lubricant on metal parts can help prevent rust. Cover It Up: Use a breathable cover to protect it from dust and moisture. Avoid plastic tarps that can trap humidity. Storing your scooter in a dry, temperature-controlled environment is best. Garages can work, but if they get really cold or damp, consider an indoor spot if possible. This helps protect the battery and electronics. Spring Tune-Up Essentials Once the frost starts to thaw and you're ready to get back outside more, it's time for a spring check-up. This is your chance to catch anything that might have happened during storage or the previous season. Battery Check: Give the battery a full charge and check its overall condition. If it's not holding a charge like it used to, it might be time for a replacement. Tire Inspection: Look for any signs of wear, cracks, or low pressure. Properly inflated tires make for a smoother ride and better battery life. Brake Test: Make sure your brakes are working effectively. Test them in a safe, open area. General Inspection: Look over all the nuts and bolts to make sure they're tight. Check the lights, horn, and any other accessories. Mid-Season Performance Checks Even during the active months, a quick check now and then can keep things running smoothly. You don't need to do a full overhaul every week, but a few minutes can make a difference. This is especially true if you're using your scooter more frequently or tackling different terrains. For example, if you've been using your scooter on paths that might be similar to those needing wheelchair ramp maintenance , it's a good idea to check for wear and tear. Listen for New Sounds: Any squeaks, rattles, or grinding noises? Try to pinpoint where they're coming from. Monitor Speed and Handling: Does it feel like it's slowing down or handling differently than usual? Quick Clean: A quick wipe-down after a dusty or muddy outing can prevent buildup. Regular checks, especially before and after seasonal changes, help keep your scooter reliable and safe for all your travels around Dalton, Ringgold, and LaFayette. When to Seek Professional Mobility Scooter Service Sometimes, even with the best care, your mobility scooter might need a little extra attention. Knowing when to call in the pros is key to keeping your ride reliable and safe. Don't wait until a small issue becomes a big problem. Signs Your Scooter Needs Expert Attention While you can handle a lot of the basic upkeep yourself, some things are best left to the professionals. Keep an eye out for these common indicators that it's time to visit a service center: Sudden or persistent strange noises: A squeak here or there might be nothing, but grinding, clunking, or loud whirring sounds usually point to something more serious, like a motor or gearbox issue. Significant loss of power or speed: If your scooter suddenly feels sluggish, struggles on inclines it used to handle easily, or its top speed has dropped noticeably, it could be a battery problem, a controller issue, or even a motor fault. Braking system feels off: If the brakes don't engage as firmly as they used to, feel spongy, or make unusual noises, this is a safety concern that needs immediate professional assessment. Steering becomes difficult or erratic: If the handlebars feel stiff, loose, or pull to one side unexpectedly, it could be a problem with the steering mechanism or even the tires. Electrical warning lights or error codes: Most modern scooters have diagnostic lights or display codes. If one pops up and stays on, consult your manual and then a technician. Finding Local Service Providers in Dalton When you do need professional help, finding a reliable local service provider is important. For those in the Dalton area, there are options available. You might find a local shop that specializes in mobility equipment. Sometimes, the place where you purchased your scooter can also handle repairs, or they can point you in the right direction. Don't hesitate to ask friends or other scooter users for recommendations. For instance, there's a provider in Dalton, GA, known for good service and products, just a short drive away mobility equipment sales. Understanding Repair vs. Replacement It's not always clear whether a repair is worth the cost or if it's time to consider a new scooter. A good technician can assess the situation and give you an honest opinion. They'll look at: The age and overall condition of your scooter. The cost of the needed repairs compared to the price of a new or gently used model. The availability of parts for your specific model. Sometimes, a seemingly minor issue can be a symptom of a larger problem that might be expensive to fix. It's always wise to get a professional diagnosis before committing to costly repairs, especially if your scooter is older. A qualified technician can help you make an informed decision that balances cost and continued mobility. If your scooter is frequently breaking down, or if the repairs are becoming more frequent and expensive, it might be more economical in the long run to invest in a newer model. However, for many common issues, a professional repair can get your scooter back in top shape, allowing you to continue enjoying your independence. Is your mobility scooter acting up? Don't wait until it completely stops working. If you notice it's running slower than usual, making strange noises, or the battery isn't holding a charge like it used to, it's probably time to get it checked out. Ignoring small issues can lead to bigger, more expensive problems down the road. For reliable repairs and maintenance, visit our website today to schedule a service appointment ! Keep Rolling Through Winter So there you have it. Taking care of your mobility scooter now means fewer headaches later, especially when the weather gets rough around Dalton, Ringgold, and LaFayette. A little bit of attention can go a long way in keeping you moving freely. If you ever get stuck or need a hand with repairs or upgrades, remember North Georgia Mobility has been helping folks out for ages. They know their stuff and are right here in Ringgold. Don't let winter slow you down – keep that scooter in good shape and enjoy your freedom all season long. Frequently Asked Questions How often should I charge my mobility scooter battery, especially during colder months? It's best to charge your scooter's battery every night, just like you would your phone. During winter, when you might use it less, keeping it fully charged is still super important. Don't let it sit with a dead battery for too long, as this can shorten its life. Think of it like keeping your car battery healthy – regular charging is key! What's the deal with tire pressure, and why does it matter for my scooter? Keeping your tires properly filled with air is like making sure your bike has the right tire pressure. If they're too low, it makes it harder to steer and can even make your scooter go slower. Too much air can make the ride bumpy. Check the sidewall of your tire for the recommended pressure and give them a squeeze now and then to make sure they feel firm but not rock hard. My scooter is making a weird noise. What could be causing it? Strange sounds can be a bit alarming! Often, it's something simple like a loose part, maybe a bolt that needs tightening. Sometimes, it could be the motor or the wheels. If it's a squeak, it might need a little lubrication. If the noise is loud or concerning, it's a good idea to have it checked out by a professional. Why is my mobility scooter not going as fast as it used to? A slower scooter can be frustrating. It could be a sign that the battery isn't holding a full charge anymore, or maybe the tires are low on air, creating more drag. Sometimes, it's just a sign that some parts need a little tune-up. Check the simple things first, like tire pressure and battery charge, before assuming it's a big problem. How should I clean my mobility scooter to keep it working well? Cleaning your scooter regularly is like giving it a bath! Use a damp cloth to wipe down the body and controls. Avoid spraying water directly onto the electrical parts or the battery. Keeping it clean prevents dirt and grime from getting into moving parts and causing issues. A clean scooter is a happy scooter! When should I think about getting professional help for my scooter? If you've tried the basic checks and your scooter is still acting up – maybe it's making loud noises, not moving well, or the brakes feel off – it's time to call in the experts. Companies like North Georgia Mobility have skilled folks who know these scooters inside and out. They can figure out if it's a simple fix or something that needs a bigger repair.
stair lift installation GA
By Rise Design January 31, 2026
Upgrade your home with stair lift installation GA in February. Enjoy winter comfort & independence in Calhoun & LaFayette.